Ceramic, Porcelain Tile, Stone Installation
Do-it-yourself
Bay Area CA | Concord CA | San Ramon CA | San Francisco CA | Walnut Creek CA | Danville CA
Tile Installation Tools
Choosing proper tools - In order to starting installation in any tile and stone you need to have right installation tools and equipments, such as notched trowel, rubber mallet, suction-cups tile nippers, grout float, heavy duty drill for mixing.
Floor Preparation
How to Floor Preparation for tile and stone installation – Preparing the floor and the surface before installing any tile and stone is real important item to insure a quality and long lasting tile installation.
The substrate whether is wall or floor which to be tiled must be with the installation standards and manufactures instructions. Ceramic tile and Porcelain tile can be install over plywood or concrete subfloor. Below is a few guide lines which help you to have a successful tile installation.
The floor or wall which to be tiled must be free of the dust and debris that could affect adhesion of the tile to the floor or wall.
Remove the high spot by scraping or grinding the ridges.
Fill the holes and cracks with proper patching compound recommended by tile manufacturer.
Remove any moldings, base board, appliances.
The area variation in tile installation on horizontal floor should not be more than ¼” in every ten feet.
You may needs to undercut the door jambs for tile to slip under, simply used the same tile that you’re installing for your measurement.
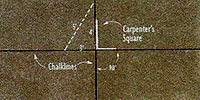
Layout of Tile and Stone.
Snap a chalk lines between the center points of all four walls Begin at the intersection of the two longest right-angle walls. Lightly dust a section of mortar with dry cement if you are using a Portland cement mortar setting bed. If you find that the mortar is too dry to saturate the cement you just dusted on, sprinkle it with water.
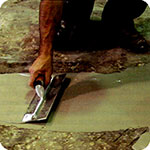
After laying a small section of tile, beat it down with a beating block to ensure a good bond and a smooth, level application.
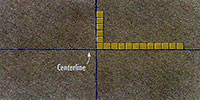
When installing tile adjust the layout in a way to minimize extra tile cutting and to avoid tile less than half.
Thin-Set and Adhesive Material
Choosing the right type of adhesive, thin-set is essential.
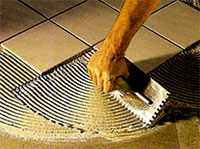
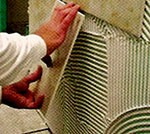
Apply settings material in accordance with manufacture’s direction and install tile before mortar has started initial cure. For thin set mortar application, use a notch trowel that will achieve the recommended coverage of mortar after tiles have been installed.
Do not spread more material than can be covered with 10 to 15 minutes. If “skinning” occurs, remove mortar and spread fresh material. Spread mortar with notches running in one direction that shall be perpendicular to the pressing, pushing and pulling of tile during placement.
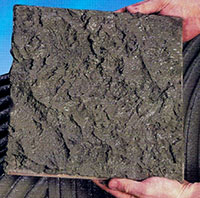
Test Bond
Place tile in fresh mortar, press, push and pull the tile slightly to achieve as near 100% coverage and contact of tile with setting material and substrate as possible. The coverage shall be no less than 85% and be sufficiently distributed to give full support of the tile.
Tile adhesive require no added liquid or powder. Is a cure or sets by evaporation. Tile adhesives are usually not recommended for swimming pools or exterior application.
Cutting Tile
Tiles needs to be cut with real accuracy simply used a pencil measure the tile and make strata or diagonal cuts. These cuts need to be done by tile cutter or a tile nipper. The cut edges of tile should be smooth and need to be done by proper tools or wet saw.
Setting Tile
In order to have a quality tile installation first check the style, color and size and compare to your purchase order. Open a few boxes of tile and mix them and remove the defective tiles. Start the installation of tile in the center of the area. Place tile spacers in the comer of every tile when setting to obtain exact, even spacing joints for the professional look.
It is recommended that spacer be removed before grouting. During the tile installation and before the tile setting has been fully taken place, check peaces that has been install and fix the problem. Used a rubber mallet or beatings block in order to make the tile flush with each other. Leave ¼” gap (expansion joints) between the tile and walls.
Remove excess thin-set, adhesive and spacers from joints with a putty knife. Tile should not be walked on for 24 hours.
Expansion Joints in Tile Installation
Like any hardwood and laminate installation, tile installation also requires expansion joints due to changes in temperature, load stresses and other factors.
Expansion joints are generally required for installation of tile whenever there is change in the backing material, or where tile meets perimeter walls, and ceilings. Expansion joints are also required when large areas are tiled. In exterior tile, joints should be installed 12 to 16 feet on center. Interior tile installations require joints 24 to 36 feet on center.
Expansion Joint Size: A working butt joint can range in size from a minimum of ¼” X ¼” to a maximum of 1” X ½”.
Standard joint widths for tile.
Joint type
Exterior, 12’ o.c
Exterior, 16’ o.c
Interior, Quarry or Pave tile
Interior, ceramic mosaic and glazes wall tile
Joint Size
3/8” minimum
½” minimum
¼” minimum
1/8” minimum,
¼” preferred
Grouting Tile
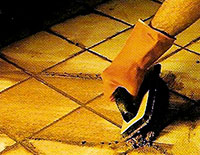
Tile grout should be mixed properly according to manufactures recommendations. Grout needs to be applied with a rubber grout float.
Tile installation must be firmly set 24 hours prior to grouting. If the temperature is below 60 degrees, you wait 48 to 72 hours before grouting.
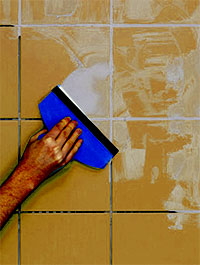
Before grouting remove all spacers, thinset and debris from the grout joints by putty knife, sweep or vacuum the grout joint.
Using a rubber grout float at a 45 degree angle spread the gout over one section of installed tile surface at a time. Push the grout into the joints until they are completely filled. Hold the edge of the grout float at a 90 degree angle to remove excess grout, also keep the grout float diagonal to the grout joints so you do not pull up grout which has filled in the joints. Use a damp sponge or towel to smooth and finish off the grout in a circular motion.
Grout is now coming in pre-mixed grout which makes the grout installation Fast, Easy to clean up and requires no Sealent. Some of these grouts are also good for high traffic areas and have a better color consistency and are stain resistance.
In pre-mixed grout there is no dust, has low VOC and no waste, also grout has mold and mildew protection.
Schluter®-DITRA Uncoupling Membrane Installation
Since 1973, McCurley’s Floor Center has been providing flooring installation for various commercial and residential projects with the highest level of dependability, workmanship, and excellence. We are a licensed floor covering, ceramic & mosaic contractor, as well as a licensed general building contractor.
In addition to our national distributor channels, you can find tile and stone products in our showrooms in the San Francisco Bay Area, San Ramon and Concord. These showrooms display a large selection of tile and stone available for instant purchase or to be shipped nationwide. We offer tile and stone installation services in many areas for commercial and residential projects. McCurley’s Floor Center is licensed, bonded, and insured, and our in-house installers have knowledge and experience for any tile and stone products.
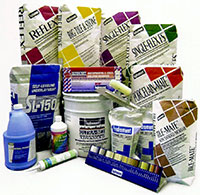
Our professional staff can help you with all of your tile and stone needs from sample selection to free estimates and consultation to delivery and flooring installation. MacFloor.com can meet any job requirement for ceramic tile, porcelain, granite, marble, travertine or lime stone. Whether you’re an architect, contractor, builder, designer or consumer we have a worldwide resources and distribution systems to meet your project needs. We specialize in green and environmentally-friendly tile and flooring products designed for sustainability. McCurleys also carries flooring installation supplies, and floor care and maintains products including tile and stone cleaner / sealer / grout / and other for your various flooring needs from major brands such as Hydroment | Bostik | Auqamix | Mapei |Custom Builders Products | Star Quartz Epoxy Grout | Tru Color by Bostik | Shaw | Laticrete | Quartz Lock | Spectra lock
If you are a Contractor, or a do-it-yourself person, we have great learning resources for you to complete your project.
Please email your inquiry at info@MacFloor.com or call at 925-866-2200. Come and visit us and see our line of tile and stone today!!
Copyright 2005 - 2020, McCurley's Floor Center - All Rights Reserved.